FTP Client Information
Introduction
FTP stands for File Transfer Protocol. This is how you will be sending files or your web work, back and forth into the Rio Salado web site. A program that's used to send or retrieve files is called an FTP client. This is the software that you will use to upload and download your homework files.
You may use any FTP client program to upload and manipulate your files. If you are working on a Windows based PC, you can use the built in Windows File Explorer to upload your files. Use this tutorial to get started.
Cyberduck is a popular open source FTP client that is supported by Rio Salado and offers a free version available for both Windows and Mac (see below for a tutorial on how to use it).
Information you will need:
FTP Server Address: ftp://classweb.riosalado.edu
Port: 21 (this is the normal default)
Login: Use the same username and password that you use to login to RioLearn
Web Address: http://classweb.riosalado.edu/{your username}
Example: http://classweb.riosalado.edu/Imastudent6789
If you are having trouble uploading your files to the server, please contact the Technology Helpdesk at 480-517-8600.
Using FTP with Microsoft Windows File Explorer
Microsoft Windows© allows the creation and data transfer via FTP of files using Windows Explorer©, the same folder viewer you would use when browsing for files on your computer.
To create and connect to an FTP server do the following:
- Open Windows Explorer© by either:
- Right-click on your START button and choose "Open Windows Explorer"
- Pressing the key combination of Windows Key+E on your keyboard
- Click on START, then click on "Computer", or "My Computer"
- Once Windows Explorer© is open, make sure you can "see" your hard drives and that "Computer" or "My Computer" is highlighted on the left.
- Right-click on a blank area in the right pane.
- Click on "Add Network Location"
- The Add Network Wizard will open. Click on NEXT, Click on "Choose a custom network location", then click NEXT.
- In the "Internet or network address" field type ftp://classweb.riosalado.edu and then click NEXT.
- Uncheck "Log on anonymously" and enter your MEID.
- Type a name for this network location, or leave the default name in there and click NEXT.
- Choose the option to open the network location, and click FINISH.
- Windows Explorer© will open to your FTP network location. Double-click on your class folder for CIS133DA.
To transfer your lessons:
- Drag your lesson folder from the desktop to your FTP folder and release. After a few seconds your folder will now be on the Classweb Server.
- Build your URL using the Web Address Builder Tool:
https://secure.riosalado.edu/CourseResources/_interactive/shared_widgets/urlBuilder/url_builder.html
Submit your URL via the lesson instructions.
Tutorial for Cyberduck FTP
Once you have downloaded and installed Cyberduck FTP, the first thing you will need to set up the server.
- Click on the
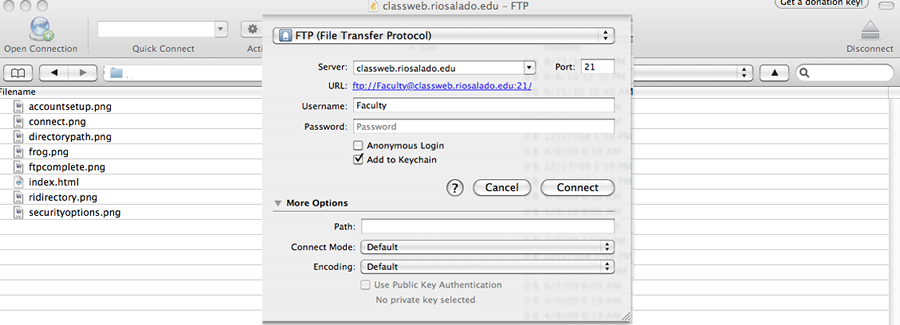
 button in the toolbar. The Connect dialog box will open. Figure 1
 - If needed, click More Options to see all the available options.
- Complete the information:
- Server = classweb.riosalado.edu
- Port = should be left at default of 21.
- URL = Will be filled in for you when you complete all the information
- Username/Password = same login credentials that you use to log into RioLearn.
NOTE: Rio advises against storing your password due to possible security risks. It is best to type in your password every time.
- Path = /{Your Username} - this will direct you to your folder on the server. E.g. /imastudent123
- Click Connect to connect to the server.
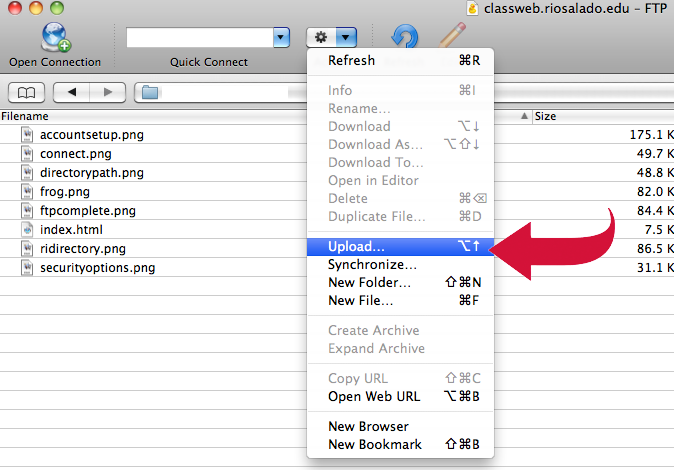
The left side of the screen should be the files and folders on your Hard Drive (the Local Folder). The right side of the screen will be the files and folders on Rio's FTP server (Remote Folder).
- Navigate into your class folder on the right side by double clicking on the class folder.
- Click the Actions dropdown > Select Upload. Figure 2
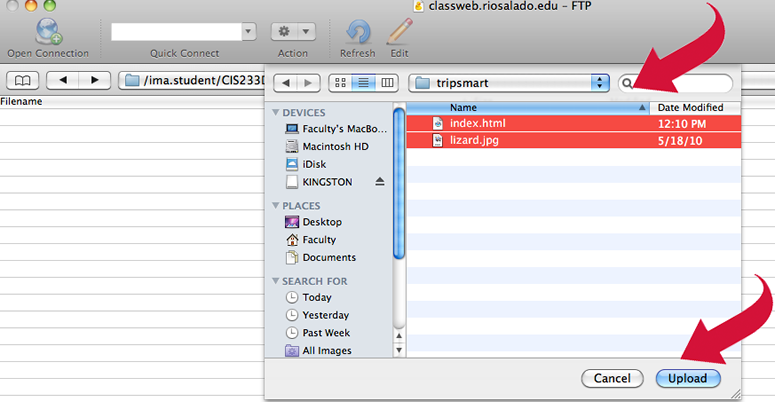
- Select the file and/or folders that you want to upload to the server. Uploading a folder will upload all content that is within that folder. Figure 3
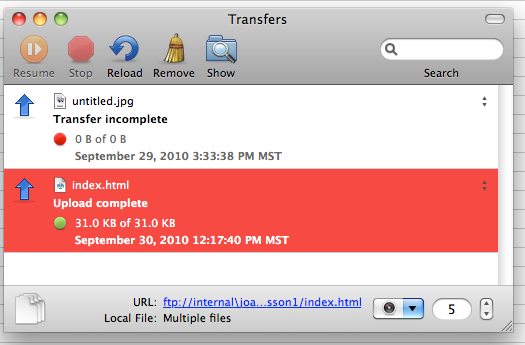
You will get a message upon completion indicating that all files are now uploaded to the server. Figure 4
- Check it by going to the URL of the html file, which would look like:
http://classweb.riosalado.edu/Username/cis133da_12345/Lesson02/index.html.